Monday, October 31, 2011

Haaa....ni idea camner nak organize gadget taman


Assalamualaikum.....


Some ideas on how to organize garden tools for those who are in love with gardening..


Gambar sebelah nie lawa laa..... jom cuba buat kat umah....
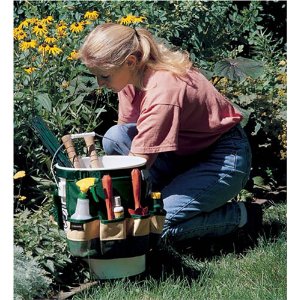
Baldi pun bolehhh.....


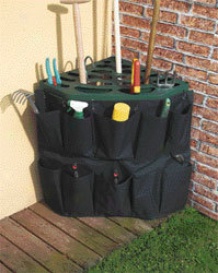
Ni untuk sudut....
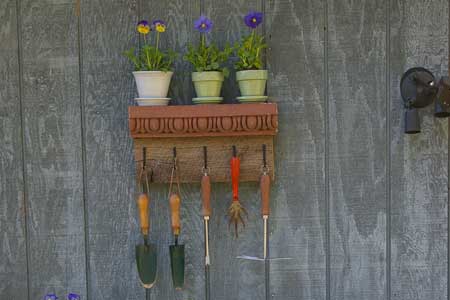
Macam ni pun nampak ok...


Gadget taman - penyodok


Spade
 

A long handled tool traditionally  used for digging, shoveling soil and compost.  They are available in various sizes and can often be bought as a set together with a garden fork.


Sunday, October 30, 2011

How to grow orchirds for beginner

Source: orchidblog

The first thing any aspiring orchid gardener needs to decide is what type of orchid to grow. The first thing to consider is the climate of the region in which you live and whether or not it supports outdoor or indoor orchid growth. The decision to grow inside or outside is one of the biggest initial decisions to be made.
Choose healthy plants.

Next, be sure to buy plants that are healthy with no signs of pests or diseases. The bulbs should all be around the same size with none significantly smaller than others. It is best to buy an orchid that has already bloomed or is blooming at the time of purchase. Always look for living roots. Plus, don’t buy from sellers who are not reputable even if the low prices are tempting. One infested plant can devastate an entire collection of orchids.

Grow similar orchids together
Try to select orchids that grow happily together. That means: do not put orchids which like the shade with orchids which like the sun. And, do not place orchids which like nighttime temperatures of 70 to 80 degrees with those who prefer cooler nighttime temperatures of 50 to 60 degrees. Grow orchids together only if they have similar needs.

Make plenty of space
Orchids come in all sizes. Always be sure to research how tall your orchid is going to grow before purchasing it. Some tiny orchid plants may be no more than a few inches high, while others can be over two feet tall. A small orchid can spread out its flower stems to be over five feet long. If growing orchids inside, make sure that your house has enough room for your species to spread out.

Check humidity levels
Most warm orchids need pretty high humidity levels in order to thrive and flower. Many should be in the 60% to 80% range. If you live in a place where it gets very cold in the winters, you most likely will not be able to maintain such a high humidity level without building a greenhouse or some type of glass enclosure. Some of the cool orchids or terrestrials are not so demanding about moisture. These are better selections for beginners.

Water orchids well
The watering of orchids is one of the most critical aspects of orchid care. Most orchids are served well by watering once a week. You should wait for the plant to dry out but don’t let it get totally dry in-between watering. The top should be dry to the touch and the pot should feel light. One of the biggest mistakes beginners make with orchids is over-watering. Water the plant well–until water flows from the drainage holes. But make sure the orchid is well-drained and there is never any accumulation of water.

Air circulation is necessary
Orchids need to be able to have a lot of air circulation for superior growth. Unlike most plants, except for a few terrestrial varieties, orchids are not planted with their roots growing into the soil. Whatever media you use for planting–fir bark, sphagnum moss, peat moss or others, it is essential that the entire growing area has adequate ventilation. Inside, a ceiling fan on low is just right for proper air circulation. Stale air can cause an orchid to deteriorate.
If you want your orchids to flower, you are going to have to fertilize them. There is not a lot of agreement among gardeners as to the best fertilizer for orchids. Everyone seems to have their own pet theory. The best way is to simply try a couple of different fertilizing options and see which works out the best. You can go all organic with your fertilizers, using compost from worm castings or fish emulsions, or you can use synthetic fertilizers, such as 10-10-10 with varying amounts of nutrients.
Saturday, October 29, 2011

Label untuk laman


Assalamualaikum...dan selamat pagi semua...
Pagi Sabtu ni..jom tengok-tengok apa yg boleh menceriakan lagi taman kita....Apa kata cuba buat garden label nie....


Cara-cara membuat label taman menggunakan kepingan kayu

Kita perlukan papan lebar lebih kurang 1" dan kayu utk dijadikan tiang

Letakkan tiang macam gambar ni...dan kemaskan dgn 2 batang paku...atas dan bawah
Itu langkah asasnya...lepas tu boleh la kita catkan dan warnakan perkataan2 @ phrases yg kita suka..Selamat Mencuba...

Friday, October 28, 2011

intai-intai aksesori taman...comel-comel... murah-murah...


Salam Jumaat semua...
Pagi Jumaat nie...cuaca hujan...suasana suram...tapi...dingin...cukup menyenangkan...bagi saya ler...
Pagi nie saya nak share gambar2 ornamen @ org panggil hiasan taman yg comel2...semua nie kyg ada kat laman saya je...ada yg beli...ada yg kawan2 kasi...Ornamen taman ni saya xde la beli yg mahal2...cukup stakat sedap mata memandang and light up the garden...give colours to our garden...
Cuba tengok gambar-gambar nie...comel betul....


Mak itik nie..dgn yg kat bawah tu...makcik saya yg kasi..


Arnab putih ni pun...kawan yg kasik...teman dia itik comel kat atas tu..

wheelbarrow sebelah ngan bucket nie...beli kat Cameron Highlands


So cute la tengok sekawan haiwan nie...nati la ada masa...boleh buat cerita dongeng kat diorg semua..."pada zaman dahulu....." So, frens yg ada hiasan taman yg comel2 boleh ler kongsi ye...yg beli kat 'oversea' ke....mesti cantik2 kan...Marilah sama-sama menghidupkan lagi laman kita....Bye..

Friday, October 21, 2011

'Pak Mamat ada kebun"...Idea berkebun org dolu-dolu..

Salam...

Tengok gambar kebun sayur kat sebelah tu....actually ini kebun sayur pakcik sebelah suami saya yg bagi saya seorang yg begitu gigih. Walaupun disahkan menghidap sakit jantung dan baru2 ni telah menjalani satu pembedahan...tapi dia tetap melakukan sesuatu utk berbakti pada tanah...kebun sayur ni rasanya baru sebulan diusahakan ditepi laman rumah dia....Sejuk mata saya memandang anak2 pokok cili...bendi dan kacang panjang pun ada...yang semuanya mula menjenguk langit....Good job Pak Teh!!


Kalau pandai cuba teka pokok apa kat sebelah ni.....Kalau nak tau ni ler pokok bendi..kalau kat kelate kitaorg panggil kace meor.... Selalunya satu lubang...dalam 2-3 pokok je...
Jarakkan sikit antara pokok tu...


Yg sebelah ni pulak...kacang panjang...yg ni kena buat 'para'..sbb ianya jenis menjalar...
Pacakkan btg kayu panjang kat tepi pokok tu ..

tengok cara kayu2 tu disusun...nampak senang

Gambar 1

                             gambar 1 & gambar 2 ni rupa-rupanya pokok ubi badak...1st time saya tengok pokok ubi ni. Gini rupanya cara tanam.                                                           
Gambar 2


Ni kalau nak tahu namanya cili cendol...mak teh saya cakap namanya cili cendol sbb bentuknya memanjang seperti cendol...gituh!!


Jom ler esok gi beli polibeg ngan benih sayur...kita berkebun...

Rak gantung mini pelengkap ruang taman

Salam frens,
Cuaca petang ni kat KB cam nak hujan...dah 2..3..hari dah cuaca mendung semacam... hujan x kira masa dah.. Maklumlah dah nak hujung tahun...nak masuk musim tengkujuh...cuaca camni saya suka ...lebih2 lagi kalau hari hujan...saya ni jenis yg memang suka tengok hujan..terapi.....

Amik peluang Umar saya yg tengah tidur tuu...saya nak share entry pasal rak gantung/mounted shelf yg mmg dah lama hubby buat...cuma pagi tadi je terfikir nak post kat sini. Tengok lah gambar2 kat sini ye. kalau yg mmg suka English Garden....rasanya mmg sesuai letakkan rak ni dan diserikan dgn ornamen2 English...


Hubby saya guna kayu terpakai je. lebar dalam 3" je...Panjang suka hati...bergantung kepada ruang/dinding yg kita nak letak barang tu...

Saya mmg tak suka rak yg guna sesiku...tak 'clean'. Disebabkan rak ni kecik...tak berapa lebar...hubby boleh guna 'clipped bracket' (DIY)...Pasangkan clip tu kat dinding dulu...Lepas tu masukkan papan tu kedlm bracket ...then pasangkan screw. Pasang sepasang...kiri....kanan.


Guna clip biasa je....


Letak ler apa2 yg patut ye....

Itik ke...mushroom ke...

watering can ke....wheelbarrow ke....
Cuba lah ye....

Thursday, October 20, 2011

Idea untuk tanam orkid


Salam...
Hari ni entry pasal orkid...actually orkid ni slalunya kita tengok tergantung je kan...tapi skrg ramai yang dah memilih untuk tanam dalam pasu...pasu besar ke..pasu yg lebar ke...semua boleh....hasilnya boleh tahan cantiknya...dan satu lagi mudah nak alih2...

Yg saya ni, baru je beli...takde bunga...sbb beli murah 4 hinggit je....masa tu kat  nurseri tak banyak pilihan...nak tunggu next shipping lambat lagi...so i beli jerr....


Jom jenguk orkid RM5


Salam...
Sebenarnya...orkid ni adalah pilihan suami...Dia yg beria-ria suruh beli masa bulan puasa hari tu...saja je nak cuba tanam katanya...beli yg murah2 je dulu...so untuk permulaan saya beli 2 pasu...kakak nurseri tu bagi RM4 satu...murah2...sbb yg dah lebih org pilih...tapi saya tak kisah...Lepas tu ada la saya tambah dalam 8 pasu lagi...semuanya 10 pasu...saya letak 5 pokok dlm satu pasu besar...

So...hari ni saya nak kongsi gambar2 orkid yang saya beli 5 ringgit ari tu...cantik...berbunga lebat..ada yg sampai patah2 dahan...dek bunganya yg lebat sangat...i sukeee....


Yang ni ler sampai patah2 dahan....

yang ni paling saya suka..kelopaknya besar2...


Masa beli ari tu tak perasan banyak yg berwarna putih....sbb beli lain2 hari....taoi takpe lah.. putih pun x kurang cantik dan menawannya...


Yang purple gelap ni pun special utk saya...dlm satu kotak shipping kat nurseri tu...rasanya satu @ dua saja yg warna ni...berebut...masa tu saya yg pilih dan bukak bungkusan orkid ni...satu...satu...


Kesimpulannya, berbaloi jugak tanam orkid ni...sejukkkkk mata memandang bunga2nya yg mekar..tahan lama pulak tu...so sesiapa yg masih reluctant nk tanam orkid...just go for it frens...